 The Cozy Cookbook is here!
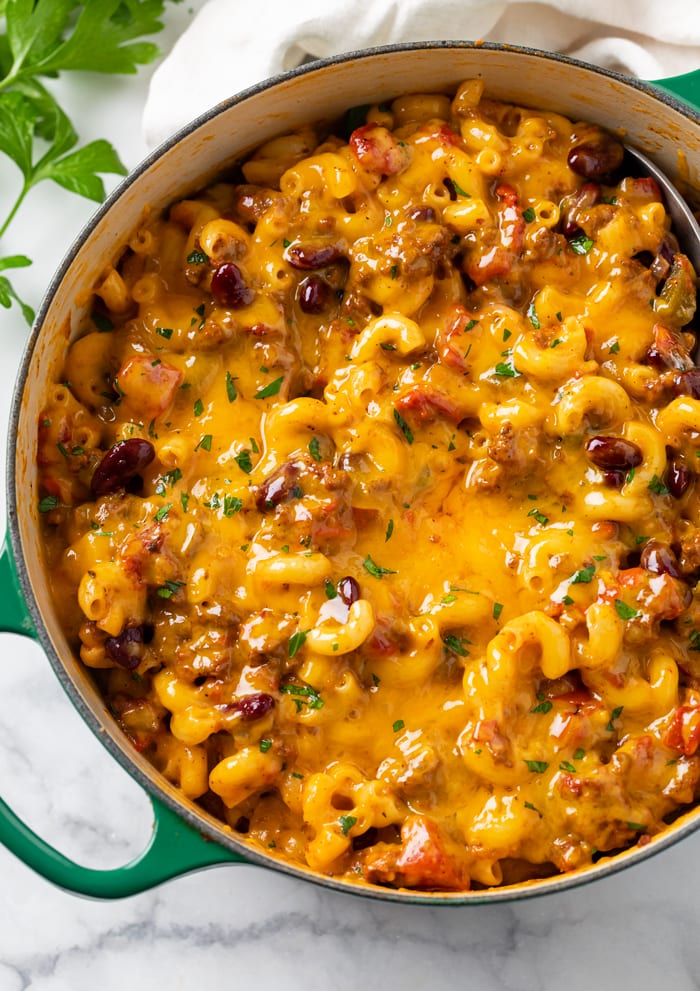
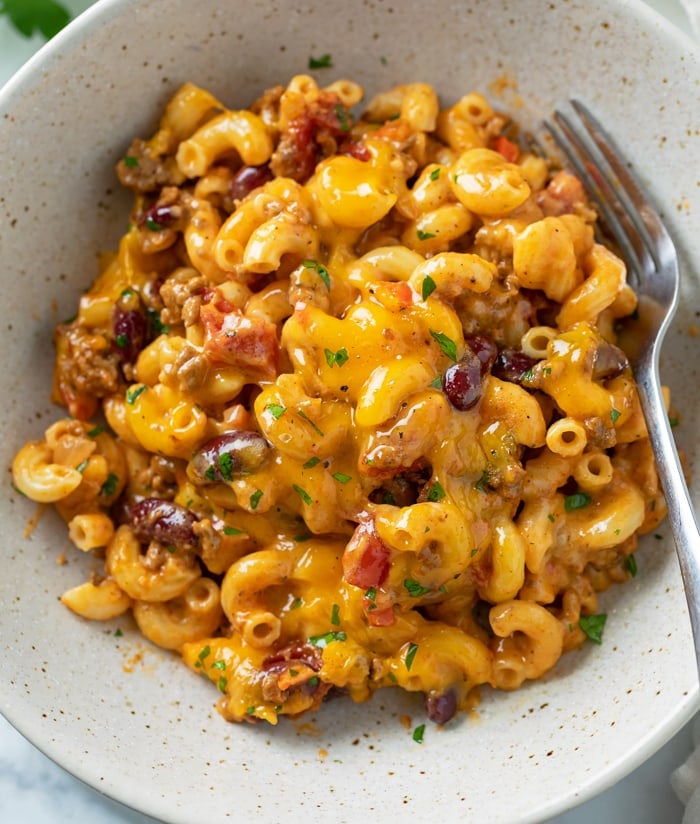
This creamy Chili Mac recipe has thick and flavorful homemade chili combined with classic, creamy macaroni and cheese. This is a meal mashup that your family will want on repeat. It’s perfect for family dinners or for enjoying game day!
Be sure to serve this with a side of Cheddar Bay Biscuits or No Knead Bread!
Chili Mac
When I think of chili mac, my personal preference is to have a full combination of hearty chili, and creamy macaroni and cheese. A lot of recipes add cooked macaroni to a pot of chili and sprinkle cheese on top. This recipe fully combines both meals into one. (And you’ll know it when you taste it!)
Once each pot is ready to go, you can choose just how much chili you want to add to the macaroni, or vice versa. (Or just combine it all, like I do! 😉)
You can even put both pots out for family or friends and let them choose their own ratios and combination preferences!
BONUS: There are also a few make-ahead options below.
How to Make It
See recipe card below this post for ingredient quantities and full instructions.
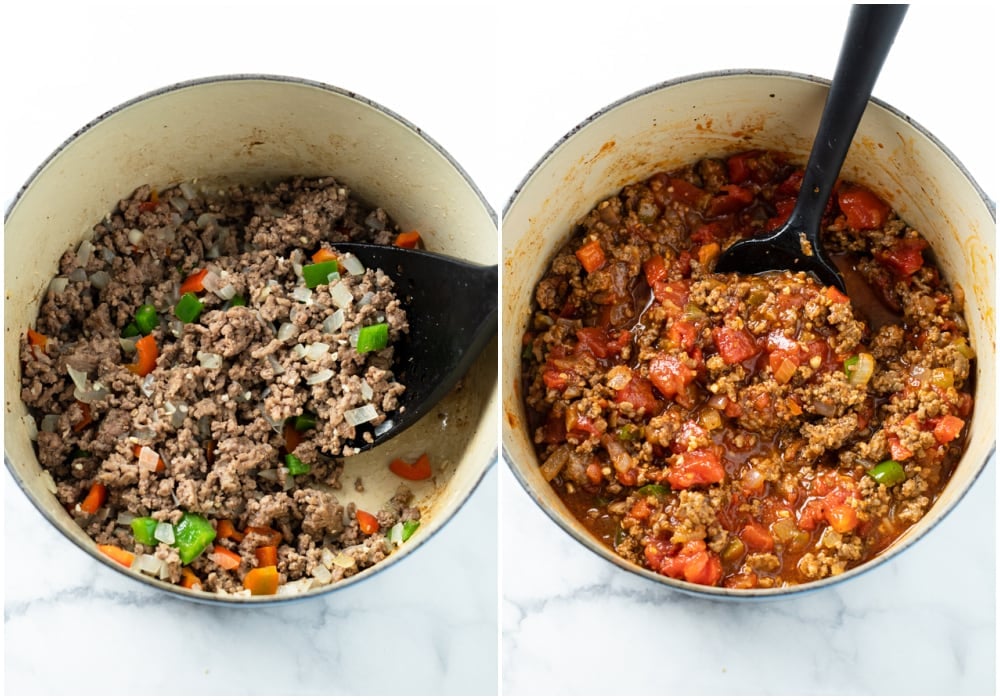
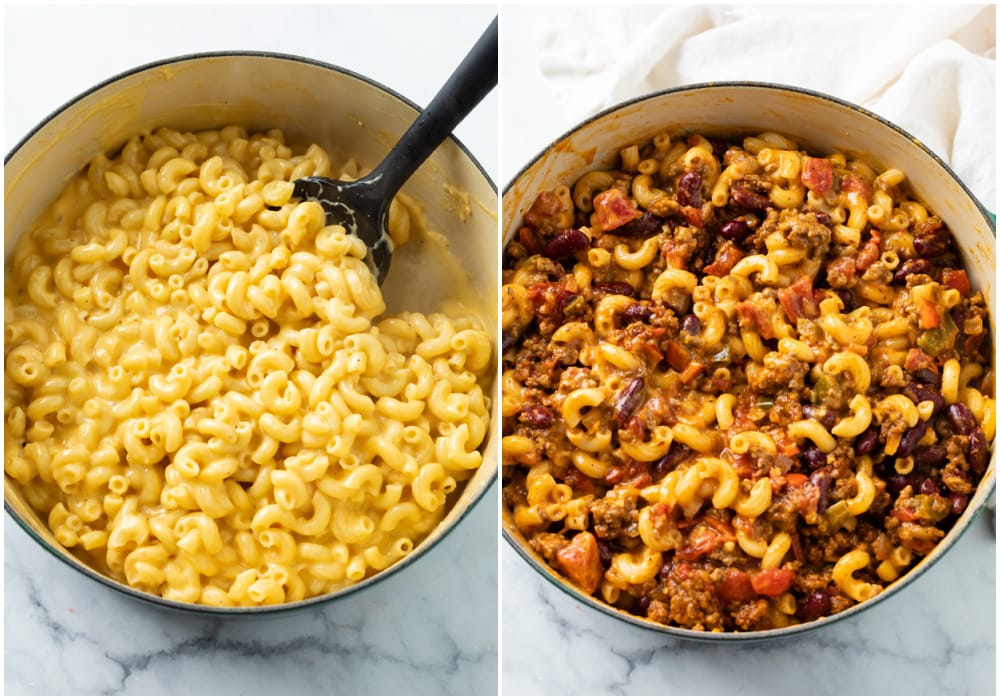
Cook and crumble the ground beef and onions until cooked through. Drain grease and add the peppers and garlic, cook until softened. Add the seasonings and tomato paste and stir to combine. Add the tomato sauce, undrained diced tomatoes, and chicken broth. Bring to a boil, reduce to a simmer.
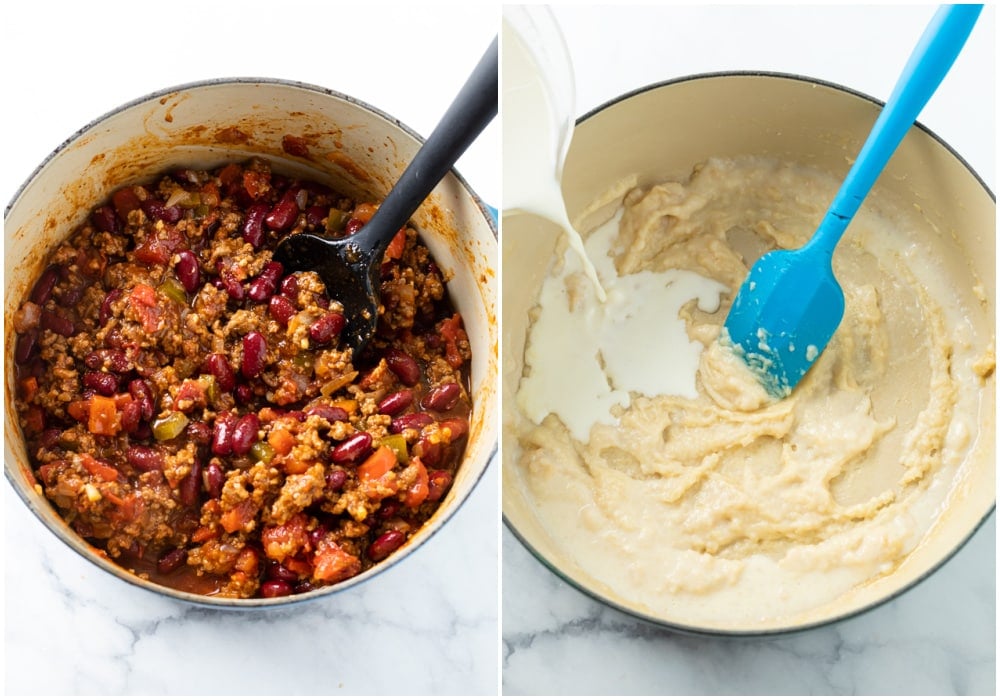
Mix in the kidney beans about 10 minutes prior to serving. Meanwhile, begin making roux for mac and cheese. Melt butter in a pan and whisk in flour. Add the heavy cream/milk in splashes, stirring continuously.
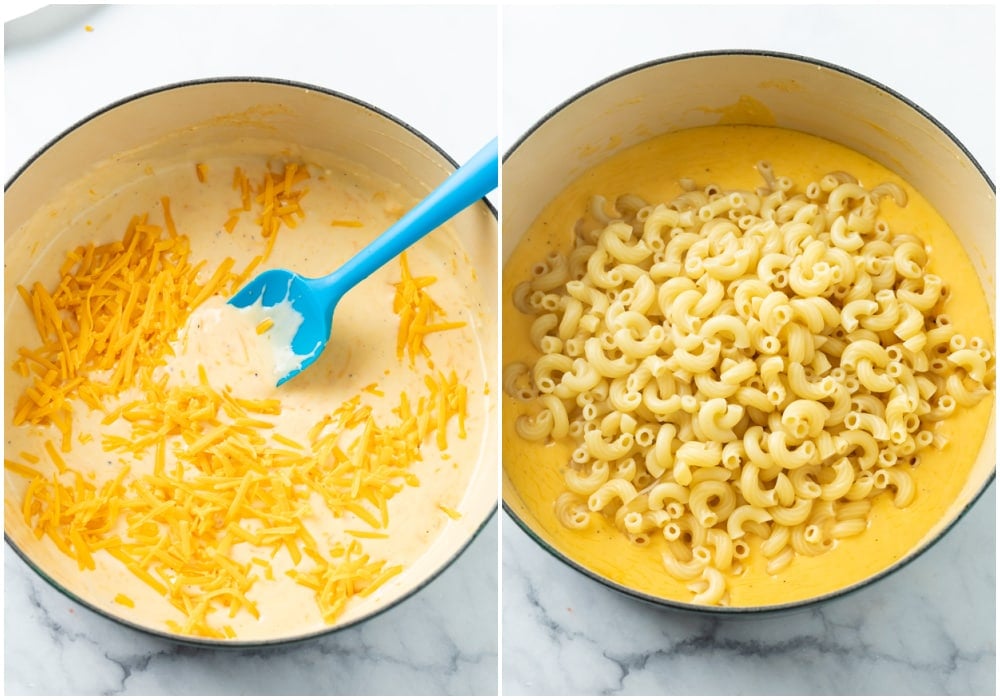
Bring to a boil, reduce to a simmer. Add the hot sauce and seasonings. Reduce heat to low and stir in the cheese. Add drained macaroni.
Stir to combine the macaroni with the cheese sauce, then add the chili and stir to combine.
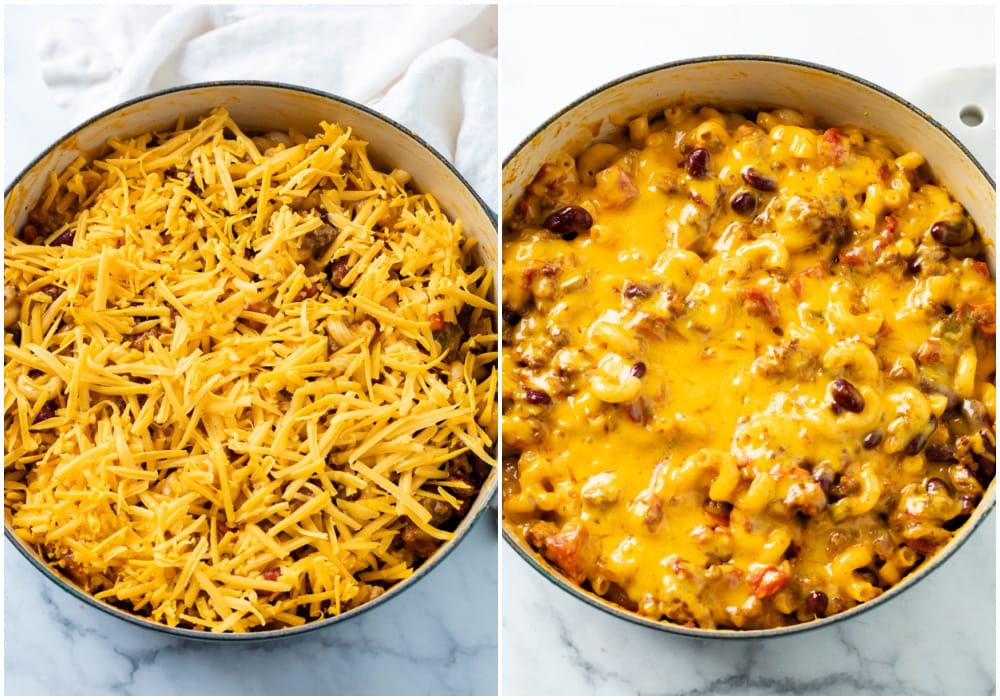
Top with cheese and bake at 400° for 5 minutes, or until the cheese is melted. Garnish with parsley and serve!
Make-Ahead Methods:
- Option 1: Make the chili 1-2 days ahead of time and store in the fridge until ready to serve. Reheat on the stove top until heated through, then proceed with cooking the macaroni and combining with the chili as outlined.
- Option 2: The chili and the macaroni can be assembled without the cheese topping and stored in the fridge until ready to serve. I suggest boiling the macaroni 1 minute shy of al dente in this case. When ready to serve, reheat the chili mac on the stop top until heated through. Top with cheese and bake at 400° for 5 minutes or until cheese is melted.
Pro Tips
- Shred the cheese from a block as it will melt and taste much better than packaged shredded cheese. I use Cracker Barrel Sharp Yellow Cheese.
- The beans in the chili can be omitted if preferred. Drained/rinsed black beans may be used instead of kidney beans as well.
- Monterey Jack Cheese makes a nice addition to the cheddar as well.
- You can’t taste the hot sauce in the mac and cheese, it is used as a flavor enhancer. I usually use Texas Pete Hot Sauce. (Frank’s hot sauce is my trusty backup!)
- Cornbread makes an excellent side dish with this!
Storage
- Store in an airtight container and refrigerate for up to 3 days.
- Leftovers can be frozen and do reheat well, be extra careful not to overcook the macaroni so that it’s not mushy when reheated. (I always use a timer.)
Tools For This Recipe
(Amazon affiliate links)- Check out all of my kitchen essentials here.
- 4.5 quart Dutch oven– The perfect size for this recipe.
- Box Cheese Grater– Shredding from a block tastes and melts much better than packaged cheese.
- Pinch Bowls– for measuring out ingredients ahead of time.
- Pasta Strainer– This is the one I have and love.
Try These Next
-

- Chicken Corn Chowder
-

- Sausage Tortellini Soup
-

- Chicken Enchilada Soup
-

- Beef Fried Rice
-

- Mushroom Chicken Pasta
-
- Steak Bites
Get My Free Meal Plan
I’ve got a Free Meal Plan with 7 of my super popular recipes (complete with grocery list)! Sign up for my email list and I’ll send it over now along with weekly dinner recipes!
And follow me on Facebook, Instagram, and Pinterest!
Tried This Recipe?
Leave a review, I love hearing your feedback! ⭐⭐⭐⭐⭐

Chili Mac
Ingredients
Chili
- 1 lbs. ground beef, 80% lean
- 1 small onion, diced
- ½ cup bell pepper, diced
- 3 cloves garlic, diced
- 1.25 oz. packet chili seasoning mix, see notes for homemade seasoning
- 1 tablespoon tomato paste
- 8 oz. tomato sauce
- 14.4 oz. can diced tomatoes, undrained
- ½ cup chicken broth, can sub beef broth
- 1 15 oz. can kidney beans, drained
Mac and Cheese
- 2 cups macaroni, uncooked
- 2 tablespoons butter
- 2 tablespoons flour
- ½ cup heavy cream
- 1 cup milk
- ½ teaspoon mustard powder
- ¼ teaspoon onion powder
- ¼ teaspoon each: salt/pepper
- ½ teaspoon hot sauce
- 1 ½ cups cheddar cheese, shredded
For Baking
- 1 ½ cups cheddar cheese, shredded
- Fresh Parsley, to garnish
Instructions
Make the Chili
- Cook and crumble the ground beef in a large pot over medium-high heat for 2 minutes. Add the onions and cook for 5 more minutes, or until the beef is brown and the onions are softened. Drain grease.
- Add the bell peppers and the garlic and cook until the peppers are softened, about 4 minutes. Add the seasoning and tomato paste and stir to combine. Cook for 1 minute.
- Add the tomato sauce, undrained diced tomatoes, and chicken broth. Stir to combine. Bring to a boil, then reduce so that it’s bubbling gently. Cover partially and let it simmer while you prepare the macaroni and cheese. The longer it simmers, the thicker and more concentrated it will get. Add the drained kidney beans during the last 10 minutes or so.
Make the Mac and Cheese
- Preheat oven to 400° F.
- Begin boiling salted pasta water for the macaroni. Proceed with preparing the cheese sauce while it comes up to a boil. Once boiling, add the macaroni and cook according to package instructions, until just al dente. (Don’t overcook it.) Drain once cooked.
- Melt the butter in a 4 ½ quart Dutch oven or large soup pot over medium heat and wait for it to begin to foam slightly. Whisk in the flour and stir continuously for 2 minutes. Add the heavy cream in splashes, stirring continuously. Add the milk in the same manner.
- Bring to a boil, then reduce to a simmer. Add the hot sauce and seasonings and stir to combine. Reduce heat to low.
- Gradually sprinkle in the shredded cheese, stirring continuously, until well-combined and smooth.
- Add the drained macaroni and stir to combine. (For extra cheesy macaroni, add slightly less pasta as the noodles will continue to absorb the cheese sauce. My images show it with the full amount being added.)
Combine the Chili & Macaroni
- Add the chili to the macaroni and use a silicone spatula to gently stir to combine. You may choose to add all of it, (as shown in the images), or some of it, the ratio of mac and cheese to chili is up to you! You can always freeze any excess chili.
Bake
- Once combined, top with 1 ½ cups cheddar cheese and bake uncovered for 5 minutes, or until the cheese is melted. Garnish with parsley if desired and serve!
Notes
- Shred the cheese from a block as it will melt and taste much better than packaged shredded cheese. I use Cracker Barrel Sharp Yellow Cheese.
- Monterey Jack Cheese makes a nice addition to the cheddar as well.
- The beans in the chili can be omitted if preferred. Drained/rinsed black beans may be used instead of kidney beans as well.
- You can't taste the hot sauce in the mac and cheese, it is used as a flavor enhancer. I usually use Texas Pete Hot Sauce. (Frank's hot sauce is my trusty backup!)
- Cornbread makes an excellent side dish with this!
Homemade Chili Seasoning (What I usually use for this recipe) • 2 teaspoons chili powder
• 1 teaspoon ground cumin
• 1 teaspoon dried oregano
• ½ teaspoon paprika
• ½ teaspoon salt
• ¼ teaspoon pepper
• 1 pinch cayenne
Make-Ahead Methods:
- Option 1: Make the chili 1-2 days ahead of time and store in the fridge until ready to serve. Reheat on the stove top until heated through, then proceed with cooking the macaroni and combining with the chili as outlined.
- Option 2: The entire recipe can be assembled without the cheese topping and stored in the fridge until ready to serve. I suggest boiling the macaroni 1 minute shy of al dente in this case. When ready to serve, reheat the chili mac on the stop top until heated through. Top with cheese and bake at 400 ° for 5 minutes or until cheese is melted.
Storage
- Store in an airtight container and refrigerate for up to 3 days.
- Leftovers can be frozen and do reheat well, be extra careful not to overcook the macaroni so that it's not mushy when reheated. (I always use a timer.)
Nutritional information is an estimate and is per cup. There are approximately 18 cups in this recipe.
Nutrition


So delicious 🫶😋😘 we love it 🥰
That’s great to hear!!!!!
I love all your recipes! This one in particular is a big favorite in our house. 🙂
Yayyy! I’m so happy this is a favorite, thanks so much for the great comments and review Caroline!💗
Stunning. A wonderfully delicious recipe that I kept eating right out of the pot before even baking with the cheese on top. I made this for freeze-ahead purposes and planned to bake with the top layer of cheese after thawing, and adding less chili than called for to fit my taste. But boy was I wrong. The chili was fantastic, and the perfect amount for the mac. I did a mix of monty jack and sharp cheddar, adding an extra 1/2 cup of extra sharp for bite. I added some extra salt, pepper, garlic powder, onion powder for extra punch, and couldn’t stop licking the spoon as I portioned off the tupperware servings for later. Thanks so much for this recipe, well done!
Thanks so much for the great comments and for taking the time to leave a review, so much appreciated!❤️ I love that even my picky daughter loves this one so I make it a lot!
The best and superior to all others NO LEFTOVERS in my house tonight
Awesome! No leftovers is so bittersweet lol. At least you know it was a hit! Thanks so much for the great review Nessy!💗
Delicious! We don’t like kidney beans so we substituted black beans. Great comfort food.
Thanks so much for the amazing review Staci, I’m so happy you enjoyed it with the black beans!💗
I made this for my family and they LOVED it. Perfect for the 60 degree weather here in Tennessee! Thank you
Hey Christina! I am sooo happy to hear that you loved the Chili Mac, this is definitely one of my favorite recipes for the chilly weather, I’m excited that cozy season is here! 🙂 Thank you so much for taking the time to leave a review, I really appreciate it! -Stephanie
Wonderful! I don’t like peppers so I didn’t add them but I followed everything else exactly how the recipe states and it was absolutely delicious. My pregnant self was craving chili Mac and this went above and beyond to fulfill the craving.
Awesome to hear Katie! I love that you listened to your pregnant self, so important!🙌 Thanks so much for the great review!
SERIOUSLY SOOOO GOOD!!! Just make it! I skipped the baking part because we were hungry and my bf is trying to do less cheese and it was phenomenal, can’t imagine how good it would’ve been with that extra step!!
I’m so happy you and you’re boyfriend liked this one Chelsea! Thanks so much for the great review!💕
This was phenomenal! Sooo good!
That’s so great to hear Ashley, thanks so much for the great review!❤️
This was delicious! I’ve never been able to find a really good chili Mac recipe that the whole family plus myself loves. I must say, I finally found THE ONE! Yay! Will be adding this to our rotation! I served it with crunched up tortilla chips and a teaspoon of sour cream on top. The kids all loved it and so did I!
This makes me so happy Amy! Such a victory when the kiddos approve! Thanks so much for the great comments and review!💗